Kubernetes 控制平面组件:API Server

API Server 简介

kube-apiserverKubernetes 最重要的核心组件之一,主要提供以下的功能

  • 提供集群管理的 REST API 接口,包括认证授权、数据校验以及集群状态变更等
  • 提供其他模块之间的数据交互和通信的枢纽(其他模块通过 API Server 查询或修改数据,只有 API Server 才直接操作 etcd

访问控制概览

Kubernetes API 的每个请求都会经过多阶段的访问控制之后才会被接受,这包括认证、授权以及准入控制(Admission Control)等。

image-20240116130419930

  1. 通过不同的 HTTP handler 来处理不同的请求
  2. 进行认证和鉴权
  3. 变形,通过自定义的一些 Webhook 修改一些对象(如果 Webhook 异常导致无法处理请求,则这个 API request 会卡住)
  4. 对象校验参数
  5. 自定义校验逻辑,通过自定义的 Webhook 校验
  6. 流量允许传到 etcd

访问控制细节

代码走读逻辑复盘:

image-20240116130437048

认证

开启 TLS 时,所有的请求都需要首先认证。

Kubernetes 支持多种认证机制,并支持同时开启多个认证插件(只要有一个认证通过即可)。如果认证成功,则用户的 username 会传入授权模块做进一步授权验证;而对于认证失败的请求则返回 HTTP 401

认证插件

  • X509 证书

    • 使用 X509 客户端证书只需要 API Server 启动时配置 --client-ca-file=SOMEFILE。在证书认证时,其 CN 域用作用户名,而组织机构域用作 group 名。
    • 默认,在 .kube/config
  • 静态 Token 文件

    • 使用静态 Token 文件认证只需要 API Server 启动时配置 --token-auth-file=SOMEFIlE
    • 该文件为 csv 格式,每行至少包括三列 tokenusernmaeuser id
    1
    token,user,uid,"group1,group2,group3"
  • 引导 Token

    • 为了支持平滑地启动引导新的集群,Kubernetes 包含了一种动态管理的持有者令牌类型,称作启动引导令牌(Bootstrap Token
    • 这些令牌以 Secret 的形式保存在 kube-system 命名空间中,可以被动态管理和创建
    • 控制器管理器包含的 TokenCleaner 控制器能够在启动引导令牌过期时将其删除
    • 在使用 kubeadm 部署 Kubernetes 时,可通过 kubeadm token list 命令查询
  • 静态密码文件

    • 需要 API Server 启动时配置 --basic-auth-file=SOMEFILE,文件格式为 csv,每行至少三列 password, user, uid,后面是可选的 group

      password,user,uid,"group1,group2,group3"

  • ServiceAccount

    • ServiceAccount 是 Kubernetes 自动生成的,并会自动挂载到容器的 /run/secrets/kubernetes.io/serviceaccount 目录中。

      1
      2
      3
      4
      5
      6
      7
      8
      9
      10
      11
      12
      13
      14
      15
      16
      ~ kubectl get serviceaccounts default -o yaml
      apiVersion: v1
      kind: ServiceAccount
      metadata:
      creationTimestamp: "2023-07-19T02:41:43Z"
      name: default
      namespace: air
      resourceVersion: "29595001"
      selfLink: /api/v1/namespaces/air/serviceaccounts/default
      uid: 16b2125c-1e75-4362-a7a9-53f380dbbf76
      secrets:
      - name: default-token-8xtx2 // 对应 secret

      // secret 内容
      ~ kubectl get secrets default-token-8xtx2 -o yaml
      // 其中的 token 是一个标准的 jwt,可以使用这个 token 访问
  • OpenID

    • OAuth 2.0 的认证机制
  • Webhook 令牌身份认证

    • --authentication-token-webhook-config-file 指向一个配置文件,其中描述如何访问远程的 Webhook 服务
    • --authentication-token-webhook-cache-ttl 用来设定身份认证决定的缓存时间。默认时长为 2 分钟。
  • 匿名请求

    • 如果使用 AlwaysAllow 以外的认证模式,则匿名请求默认开启,但可用 --anonymous-auth=false 禁止匿名请求

基于 webhook 的认证服务集成

https://github.com/kubeguard/guard

构建符合 Kubernetes 规范,构建认证服务,用来认证 tokenreview request

构建认证服务:

  • 认证服务需要满足如下 Kubernetes 的规范
  • URL: https://authn.example.com/authenticate
  • Method: POST
  • Input:
1
2
3
4
5
6
7
8
{
"apiVersion": "authentication.k8s.io/v1beta1",
"kind": "TokenReview",
"spec":
{
"token": "(BEARERTOKEN)"
}
}
  • Output:
1
2
3
4
5
6
7
8
9
10
11
12
13
14
15
16
17
18
{
"apiVersion": "authentication.k8s.io/v1beta1",
"kind": "TokenReview",
"status":
{
"authenticated": true,
"user":
{
"username": "[email protected]",
"uid": "42",
"groups":
[
"developers",
"qa"
]
}
}
}

示例:

如果解码失败,则认证失败:

1
2
3
4
5
6
7
8
9
10
11
12
13
14
15
decoder := json.NewDecoder(r.Body)
var tr authentication.TokenReview
err := decoder.Decode(&tr)
if err != nil {
log.Println("[Error]", err.Error())
w.WriteHeader(http.StatusBadRequest)
json.NewEncoder(w).Encode(map[string]interface{}{
"apiVersion": "authentication.k8s.io/v1beta1",
"kind": "TokenReview",
"status": authentication.TokenReviewStatus{
Authenticated: false,
},
})
return
}

或者转发到其他地方进行校验,例如使用 github 通过 OAuth2

1
2
3
4
5
6
7
8
9
10
11
12
13
14
15
16
17
18
19
20
21
22
23
24
25
26
27
28
29
30
31
32
33
34
ts := oauth2.StaticTokenSource(
&oauth2.Token{AccessToken: tr.Spec.Token},
)
tc := oauth2.NewClient(context.Background(), ts)
client := github.NewClient(tc)
user, _, err := client.Users.Get(context.Background(), "")
if err != nil {
log.Println("[Error]", err.Error())
w.WriteHeader(http.StatusUnauthorized)
json.NewEncoder(w).Encode(map[string]interface{}{
"apiVersion": "authentication.k8s.io/v1beta1",
"kind": "TokenReview",
"status": authentication.TokenReviewStatus{
Authenticated: false,
},
})
return
}
log.Printf("[Success] login as %s", *user.Login)

// 将结果返回给 apiserver
w.WriteHeader(http.StatusOK)
trs := authentication.TokenReviewStatus{
Authenticated: true,
User: authentication.UserInfo{
Username: *user.Login,
UID: *user.Login,
},
}
json.NewEncoder(w).Encode(map[string]interface{}{
"apiVersion": "authentication.k8s.io/v1beta1",
"kind": "TokenReview",
"status": trs,
})

配置认证服务

1
2
3
4
5
6
7
8
9
10
11
12
13
14
15
16
17
18
19
20
21
22
23
24
25
26
27
28
29
30
31
{
"kind": "Config",
"apiVersion": "v1",
"preferences": {},
"clusters": [
{
"name": "github-authn",
"cluster": {
"server": "http://192.168.34.2:3000/authenticate"
}
}
],
"users": [
{
"name": "authn-apiserver",
"user": {
"token": "secret"
}
}
],
"contexts": [
{
"name": "webhook",
"context": {
"cluster": "github-authn",
"user": "authn-apiserver"
}
}
],
"current-context": "webhook"
}

配置 apiserver

可以是任何认证系统

  • 但在用户认证完成后,生产代表用户身份的 token
  • token 通常是有失效时间的
  • 用户获取该 token 以后,将 token 配置进 kubeconfig

修改 apiserver 设置,开启认证服务,apiserver 保证将所有收到的请求中的 token 信息,发给认证服务进行验证

  • --authentication-token-webhook-config-file,该文件描述如何访问认证服务
  • --authentication-token-webhook-cache-ttl,默认 2分钟

配置文件需要 mount 进 Pod

配置文件中的服务器地址需要指向 authService

apiserver 配置文件

1
2
3
4
5
6
7
8
9
10
11
12
13
14
15
16
17
18
19
20
21
22
23
24
25
26
27
28
29
30
31
32
33
34
35
36
37
38
39
40
41
42
43
44
45
46
47
48
49
50
51
52
53
54
55
56
57
58
59
60
61
62
63
64
65
66
67
68
69
70
71
72
73
74
75
76
77
78
79
80
81
82
83
84
85
86
87
88
89
90
91
92
93
94
95
96
97
98
99
100
101
102
103
104
105
106
107
108
109
110
111
112
113
114
115
116
117
118
119
120
121
122
123
124
125
126
127
128
129
130
131
132
133
134
135
apiVersion: v1
kind: Pod
metadata:
annotations:
kubeadm.kubernetes.io/kube-apiserver.advertise-address.endpoint: 192.168.34.2:6443
creationTimestamp: null
labels:
component: kube-apiserver
tier: control-plane
name: kube-apiserver
namespace: kube-system
spec:
containers:
- command:
- kube-apiserver
- --advertise-address=192.168.34.2
- --allow-privileged=true
- --authorization-mode=Node,RBAC
- --client-ca-file=/etc/kubernetes/pki/ca.crt
- --enable-admission-plugins=NodeRestriction
- --enable-bootstrap-token-auth=true
- --etcd-cafile=/etc/kubernetes/pki/etcd/ca.crt
- --etcd-certfile=/etc/kubernetes/pki/apiserver-etcd-client.crt
- --etcd-keyfile=/etc/kubernetes/pki/apiserver-etcd-client.key
- --etcd-servers=https://127.0.0.1:2379
- --kubelet-client-certificate=/etc/kubernetes/pki/apiserver-kubelet-client.crt
- --kubelet-client-key=/etc/kubernetes/pki/apiserver-kubelet-client.key
- --kubelet-preferred-address-types=InternalIP,ExternalIP,Hostname
- --proxy-client-cert-file=/etc/kubernetes/pki/front-proxy-client.crt
- --proxy-client-key-file=/etc/kubernetes/pki/front-proxy-client.key
- --requestheader-allowed-names=front-proxy-client
- --requestheader-client-ca-file=/etc/kubernetes/pki/front-proxy-ca.crt
- --requestheader-extra-headers-prefix=X-Remote-Extra-
- --requestheader-group-headers=X-Remote-Group
- --requestheader-username-headers=X-Remote-User
- --secure-port=6443
- --service-account-issuer=https://kubernetes.default.svc.cluster.local
- --service-account-key-file=/etc/kubernetes/pki/sa.pub
- --service-account-signing-key-file=/etc/kubernetes/pki/sa.key
- --service-cluster-ip-range=10.96.0.0/12
- --tls-cert-file=/etc/kubernetes/pki/apiserver.crt
- --tls-private-key-file=/etc/kubernetes/pki/apiserver.key
- --authentication-token-webhook-config-file=/etc/config/webhook-config.json
image: registry.aliyuncs.com/google_containers/kube-apiserver:v1.22.2
imagePullPolicy: IfNotPresent
livenessProbe:
failureThreshold: 8
httpGet:
host: 192.168.34.2
path: /livez
port: 6443
scheme: HTTPS
initialDelaySeconds: 10
periodSeconds: 10
timeoutSeconds: 15
name: kube-apiserver
readinessProbe:
failureThreshold: 3
httpGet:
host: 192.168.34.2
path: /readyz
port: 6443
scheme: HTTPS
periodSeconds: 1
timeoutSeconds: 15
resources:
requests:
cpu: 250m
startupProbe:
failureThreshold: 24
httpGet:
host: 192.168.34.2
path: /livez
port: 6443
scheme: HTTPS
initialDelaySeconds: 10
periodSeconds: 10
timeoutSeconds: 15
volumeMounts:
- mountPath: /etc/ssl/certs
name: ca-certs
readOnly: true
- mountPath: /etc/ca-certificates
name: etc-ca-certificates
readOnly: true
- mountPath: /etc/pki
name: etc-pki
readOnly: true
- mountPath: /etc/kubernetes/pki
name: k8s-certs
readOnly: true
- mountPath: /usr/local/share/ca-certificates
name: usr-local-share-ca-certificates
readOnly: true
- mountPath: /usr/share/ca-certificates
name: usr-share-ca-certificates
readOnly: true
- name: webhook-config
mountPath: /etc/config
readOnly: true
hostNetwork: true
priorityClassName: system-node-critical
securityContext:
seccompProfile:
type: RuntimeDefault
volumes:
- hostPath:
path: /etc/ssl/certs
type: DirectoryOrCreate
name: ca-certs
- hostPath:
path: /etc/ca-certificates
type: DirectoryOrCreate
name: etc-ca-certificates
- hostPath:
path: /etc/pki
type: DirectoryOrCreate
name: etc-pki
- hostPath:
path: /etc/kubernetes/pki
type: DirectoryOrCreate
name: k8s-certs
- hostPath:
path: /usr/local/share/ca-certificates
type: DirectoryOrCreate
name: usr-local-share-ca-certificates
- hostPath:
path: /usr/share/ca-certificates
type: DirectoryOrCreate
name: usr-share-ca-certificates
- hostPath:
path: /etc/config
type: DirectoryOrCreate
name: webhook-config
status: {}

将上面的配置文件,通过 hostPath 挂载到 Pod 内。

将认证服务启动到本地,监听 3000 端口。

github 上,Settings - Personal access tokens - New persional access token 创建一个新的 token,配置到 ~/.kube/config 里面

1
2
3
- name: github
user:
token: <mytoken>

生产系统中遇到的陷阱

基于 Keystone 的认证插件,导致 Keystone 故障且无法恢复。

  • Keystone 是企业关键服务。
  • Kubernetes 以 Keystone 作为认证插件。
  • Keystone 在出现故障后会抛出 401 错误。
  • Kubernetes 发现 401 错误后会尝试重新认证。
  • 大多数 controller 都有指数级 back off,重试间隔越来越慢
  • gophercloud 包的逻辑,会缓存 token,缓存期间不会再去请求 Keystone 校验,针对过期 token 会一直 retry
  • 大量 request 积压在 Keystone 导致服务无法恢复
  • Kubernetes 称为压死企业认证服务的最后一根稻草

解决方案:

  • Circuit break:在 gophercloud 中增加断路器
  • Rate limit:在 Keystone 中增加限流

鉴权

授权

授权主要是用于对集群资源的访问控制,通过检查请求包含的相关属性值,与相对应的访问策略相比较,API 请求必须满足某些策略才能被处理。

跟认证类似,Kubernetes 也支持多种授权机制,并支持同时开启多个授权插件(只要有一个验证通过即可)。

如果授权成功,则用户的请求会发送到准入控制模块做进一步的请求验证;对于授权失败的请求则返回 HTTP 403

Kubernetes 授权仅处理以下的请求属性:

  • usergroupextra
  • API、请求方法(如 getpostupdatepatchdelete)和请求路径(如 /api
  • 请求资源和子资源
  • Namespace
  • API Group

目前,Kubernetes 支持以下授权插件

  • ABAC
  • RBAC
  • Webhook:独立开发
  • Node:例如授权单个节点,用于安全的隔离

RBAC vs ABAC

ABAC(Attribute Based Access Control)本来是不错的概念,但是在 Kubernetes 中的实现比较难于管理和理解,而且需要对 Master 所在节点的 SSH 和文件系统权限,要使得对授权的变更成功生效,还需要重新启动 API Server。

而 RBAC 的授权策略可以利用 kubectl 或者 Kubernetes API 直接进行配置。RBAC 可以授权给用户,让用户有权进行授权管理,这样就可以无需接触节点,直接进行授权管理。RBAC 在 Kubernetes 中被映射为 API 资源和操作。

RBAC 老图

image-20240117145603076

权限可以操作对象,多个权限可以绑定为一个角色,角色可以绑定给用户。

RBAC 新解

image-20240117145823918

Kubernetes 将权限分为全局的和 Namespace 内的,通过将权限绑定到不同的 Bindings 上划分为角色。

Role 与 ClusterRole

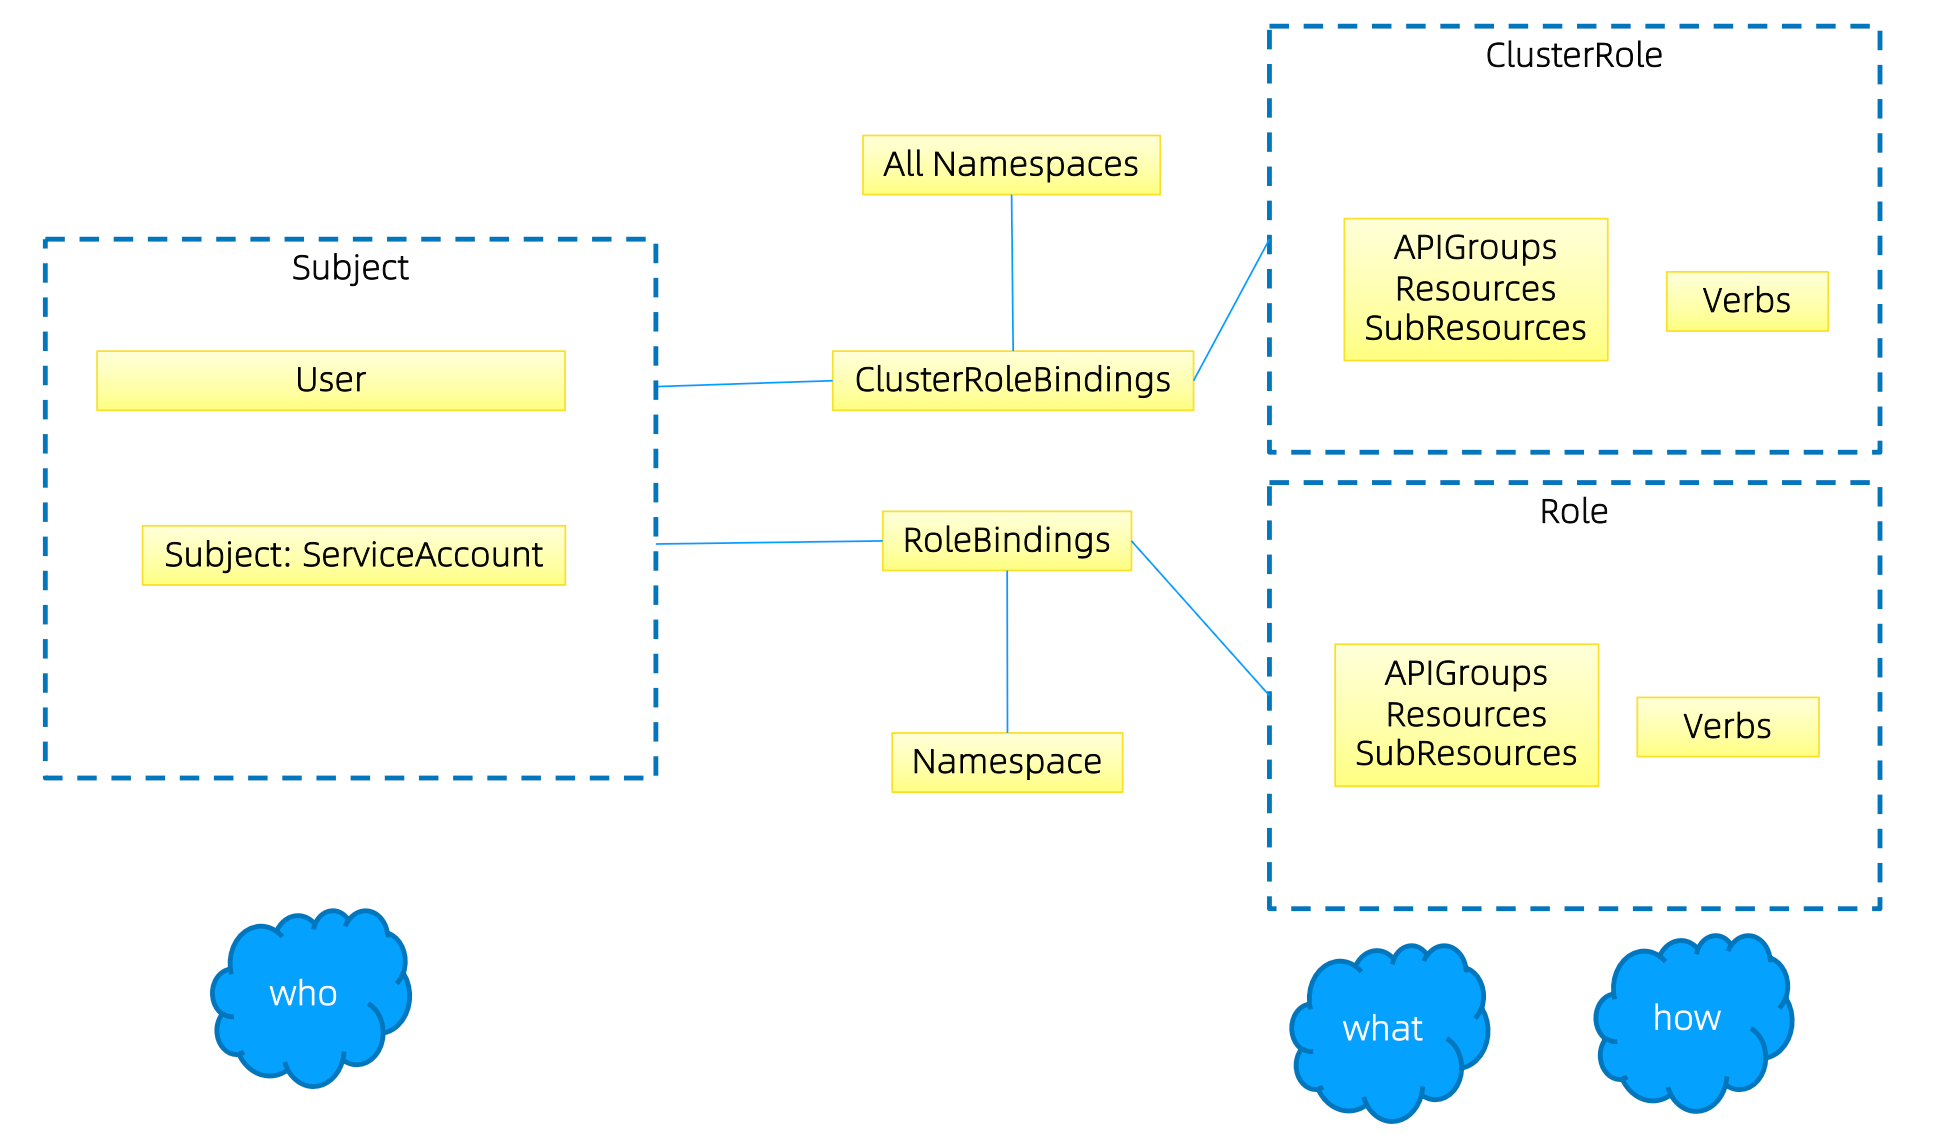
Role(角色)是一系列权限的集合,例如一个角色可以包含读取 Pod 的权限和列出 Pod 的权限。Role 只能用来给某个特定 Namespace 中的资源做鉴权,对多 Namespace 和集群级的资源或者是非资源类的 API(如 /heathz)使用 ClusterRole

Role 示例

1
2
3
4
5
6
7
8
9
kind: Role
apiVersion: rbac.authorization.k8s.io/v1
metadata:
namespace: default
name: pod-reader
rules:
- apiGroups: [""] # "" indicates the core API group
resources: ["pods"]
verbs: ["get", "watch", "list"]

ClusterRole 示例

1
2
3
4
5
6
7
8
9
kind: ClusterRole
apiVersion: rbac.authorization.k8s.io/v1
metadata:
# "namespace" omitted since ClusterRoles are not namespaced
name: secret-reader
rules:
- apiGroups: [""]
resources: ["secrets"]
verbs: ["get", "watch", "list"]

binding

将用户和角色绑定起来

image-20240117150609156

RoleBinding 示例

1
2
3
4
5
6
7
8
9
10
11
12
13
14
# This role binding allows "dave" to read secrets in the "development" namespace.
kind: RoleBinding
apiVersion: rbac.authorization.k8s.io/v1
metadata:
name: read-secrets
namespace: development # This only grants permissions within the "development" namespace.
subjects:
- kind: User
name: dave
apiGroup: rbac.authorization.k8s.io
roleRef:
kind: ClusterRole
name: secret-reader
apiGroup: rbac.authorization.k8s.io

账户/组的管理

角色绑定(Role Binding)是将角色中定义的权限赋予一个或者一组用户。

它包含若干主体(用户、组或服务账户)的列表和对这些主体所获得的角色的引用。

组的概念:

  • 当与外部认证系统对接时,用户信息(UserInfo)可包含 Group 信息,授权可针对用户群组
  • 当对 ServiceAccount 授权时,Group 代表某个 Namespace 下的所有 ServiceAccount

image-20240117152456469

针对群组授权

secret-reader 这个 clusterRole 授权给 manager 这个群组

1
2
3
4
5
6
7
8
9
10
11
12
apiVersion: rbac.authorization.k8s.io/v1 
kind: ClusterRoleBinding
metadata:
name: read-secrets-global
subjects:
- kind: Group
name: manager # 'name' 是区分大小写的
apiGroup: rbac.authorization.k8s.io
roleRef:
kind: ClusterRole
name: secret-reader
apiGroup: rbac.authorization.k8s.io

secret-reader 这个 clusterRole 授权给 system:serviceaccounts:qa 这个群组

1
2
3
4
5
6
7
8
9
10
11
12
apiVersion: rbac.authorization.k8s.io/v1 
kind: ClusterRoleBinding
metadata:
name: read-secrets-global
subjects:
- kind: Group
name: system:serviceaccounts:qa
apiGroup: rbac.authorization.k8s.io
roleRef:
kind: ClusterRole
name: secret-reader
apiGroup: rbac.authorization.k8s.io

规划系统角色

User

  • 管理员
    • 是否需要所有资源的所有权限?针对不同部门、不同层级的管理员赋予不同的权限。
  • 普通用户
    • 是否有该用户创建的 namespace 下的所有 object 的操作权限?使用 namespace 来划分服务。
    • 对其他用户的 namespace 资源是否可读,是否可写?Pod 管理隔开,但是服务可以访问。

SystemAccount

  • SystemAccount 是开发者(Kubernetes developer 或者 domain developer)创建应用后,应用于 apiserver 通讯需要的身份
  • 用户可以创建自定的 ServiceAccount,Kubernetes 也为每个 namespace 创建 default ServiceAccount
  • Default ServiceAccount 通常需要给定权限以后才能对 apiserver 做写操作

实现方案

自定义鉴权方案:

cluster 创建时,创建自定义的 role,比如 namespace-creator,包含所有权限。

namespace-creator role 定义用户可操作的对象和对应的读写操作。

创建自定义的 namespace admission controller

  • namespace 创建请求被处理时,获取当前用户信息并 annotatenamespace (新的 namespace 和新的 user 绑定起来)

创建 RBAC controller

  • Watch namespace 的创建事件
  • 获取当前 namespace 的创建者信息
  • 在当前 namespace 创建 rolebinding 对象,并将 namespace-creator 角色和用户绑定

与权限相关的其他最佳实践

ClusterRole 是非 namespace 绑定的,针对整个集群生效。

通常需要创建一个管理员角色,并且绑定给开发运营团队成员,由管理员角色操作,赋予用户权限。

ThirdPartyResource(以前的名称) 和 CustomResourceDefinition (现在的名称,简称 CRD)是全局资源,普通用户创建 ThirdPartyResource 以后,需要管理员授予相应权限后才能真正操作该对象。

针对所有的角色管理,建议创建 spec,用源代码驱动。

  • 虽然可以通过 edit 操作来修改权限,但后期会导致权限管理混乱,可能会有很多临时创建出来的角色和角色绑定对象,重复绑定某一个资源权限。

权限是可以传递的,用户 A 可以将其对某对象的某操作,抽取成一个权限,并赋给用户 B。

防止海量的角色和角色绑定对象,因为大量的对象会导致鉴权效率低,同时给 apiserver 增加负担 。

ServiceAccount 也需要授权,否则你的 component 可能无法操作某对象。

Tips:SSH 到 master 节点,通过 insecure port 访问 apiserver 可绕过鉴权,当需要做管理操作又没有权限时可以使用(不推荐)。

运营过程中出现的陷阱

案例1:

  • 研发人员为提高系统效率,将 update 方法修改为 patch(目的是增量更新,减少负担)
  • 研发人员本地非安全测试环境测试通过
  • 上生产,发现不 work
  • 原因:忘记更新 rolebinding,对应的 serviceaccount 没有 patch 权限

案例2:

  • 研发人员创建 CRD,并针对该 CRD 编程
  • 上生产后不工作
  • 原因,该 CRD 未授权,对应的组件 get 不到对应的 CRD 资源

准入

准入控制

为资源增加自定义属性

  • 作为多租户集群方案中的一环,我们需要在 namespace 的准入控制中,获取用户信息,并将用户信息更新的 namespaceannotation

只有当 namespace 中有有效用户信息时,我们才可以在 namespace 创建时,自动绑定用户权限,namespace 才可用。

准入控制(Admission Control)在授权后对请求做进一步的验证或添加默认参数。不同于授权和认证只关心请求的用户和操作,准入控制还处理请求的内容,并且仅对创建、更新、删除或连接(如代理)等有效,而对读操作无效。

准入控制支持同时开启多个插件,它们依次调用,只有全部插件都通过的请求才可以放过进入系统。

准入控制的默认插件

配额管理:

  • 原因:资源有限,如何限定某个用户有多少资源?

方案:

  • 预定义每个 Namespace 的 ResourceQuota,并把 spec 保存为 configmap

    1
    kubectl  get resourcequota -A
    • 用户可以创建多少个 Pod
      • BestEffortPod
      • QoSPod
    • 用户可以创建多少个 Service
    • 用户可以创建多少个 Ingress
    • 用户可以创建多少个 Service VIP
  • 创建 ResourceQuota Controller

    • 监控 Namespace 创建事件,当 Namespace 创建时,在该 Namespace 创建对应的 ResourceQuota 对象
  • APIServer 中开启 ResourceQuota 的 admission plugin

准入控制插件

  • AlwaysAdmit:接受所有请求
  • AlwaysPullImages:总是拉取最新镜像。在多租户场景下非常有用
  • DenyEscalatingExec:禁止特权容器的 execattach 操作
  • ImagePolicyWebhook:通过 webhook 决定 image 策略,需要同时配置 --admission-control-config-file
  • ServiceAccount:自动创建默认 ServiceAccount,并确保 Pod 引用的 ServiceAccount 已经存在
  • SecurityContextDeny:拒绝包含非法 SecurityContext 配置的容器
  • ResourceQuota:限制 Pod 的请求不会超过配额,需要在 namespace 中创建一个 ResourceQuota 对象
  • LimitRanger:为 Pod 设置默认资源请求和限制,需要在 namespace 中创建一个 LimitRange 对象
  • InitialResrouces:根据镜像的历史使用记录,为容器设置默认资源请求和限制
  • NamespaceLifecycle:确保处于 termination 状态的 namespace 不再接收新的对象创建请求,并拒绝请求不存在的 namespace
  • DefaultStorageClass:为 PVC 设置默认 StorageClass
  • DefaultTolerationSeconds:使用 Pod Security Policies 时必须开启
  • NodeRestriction:限制 kubelet 仅可访问 nodeendpointpodservice 以及 secretconfigmapPVPVC 等相关的资源

打开/关闭某个插件

1
2
3
4
5
6
7
8
9
10
11
12
13
14
15
16
17
18
19
20
21
22
23
24
25
26
27
28
29
30
31
32
33
34
35
36
37
38
39
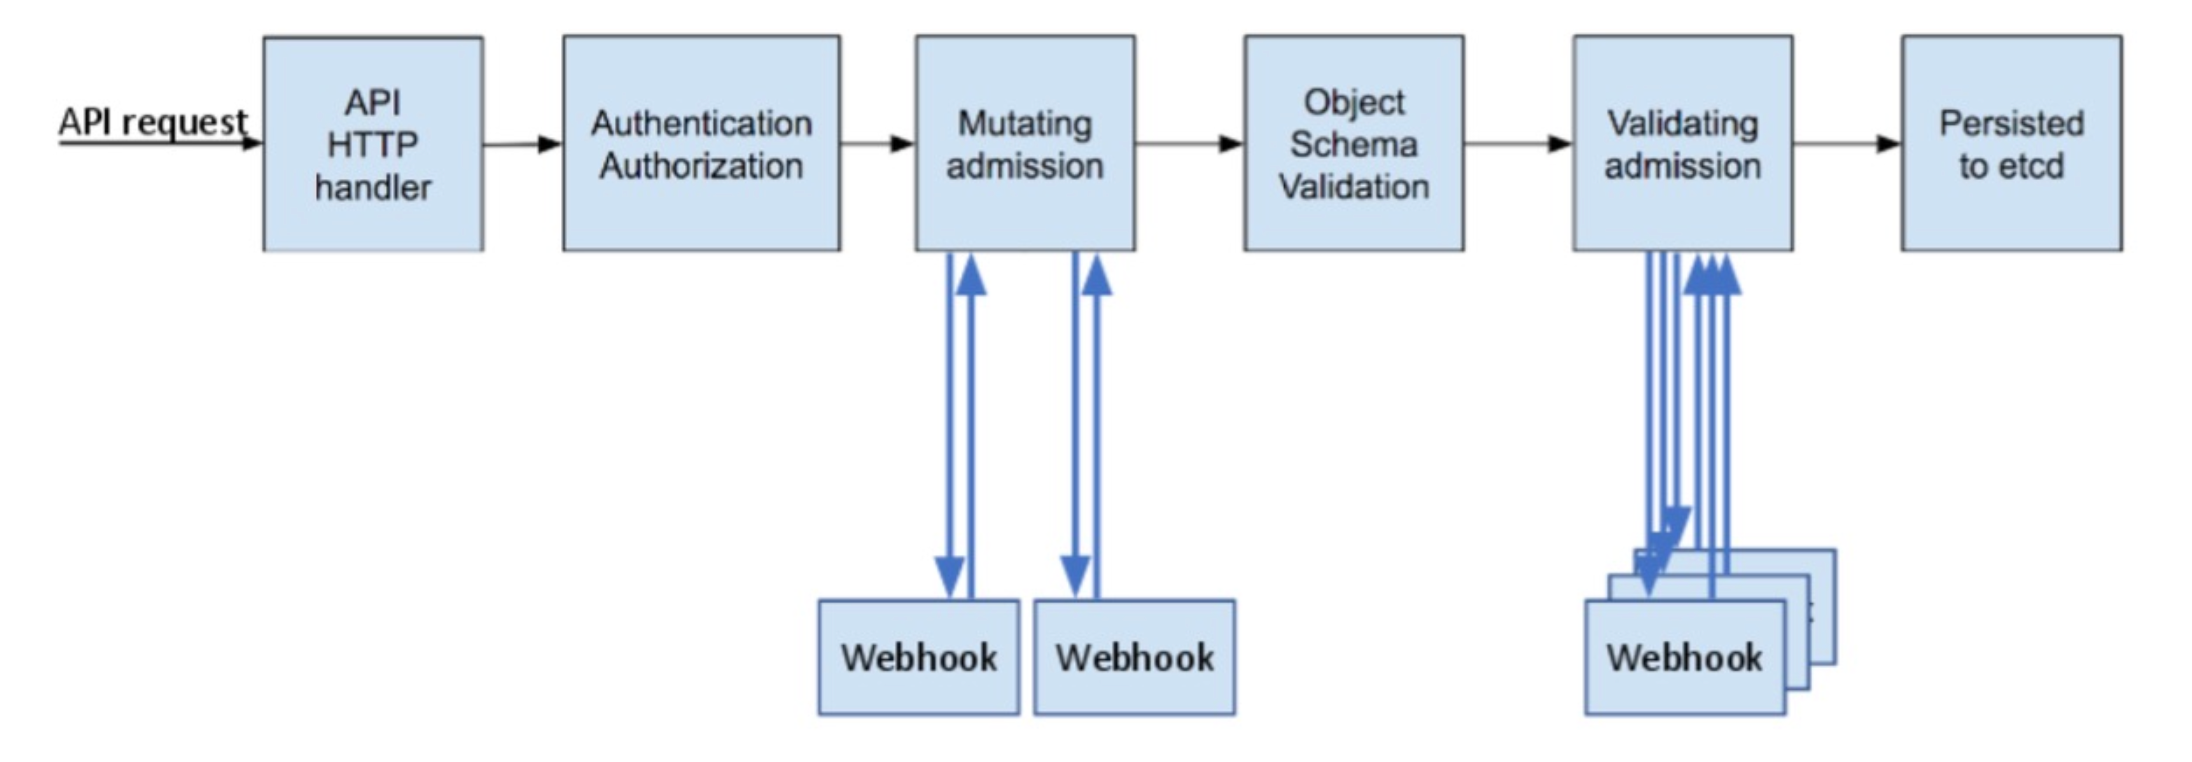
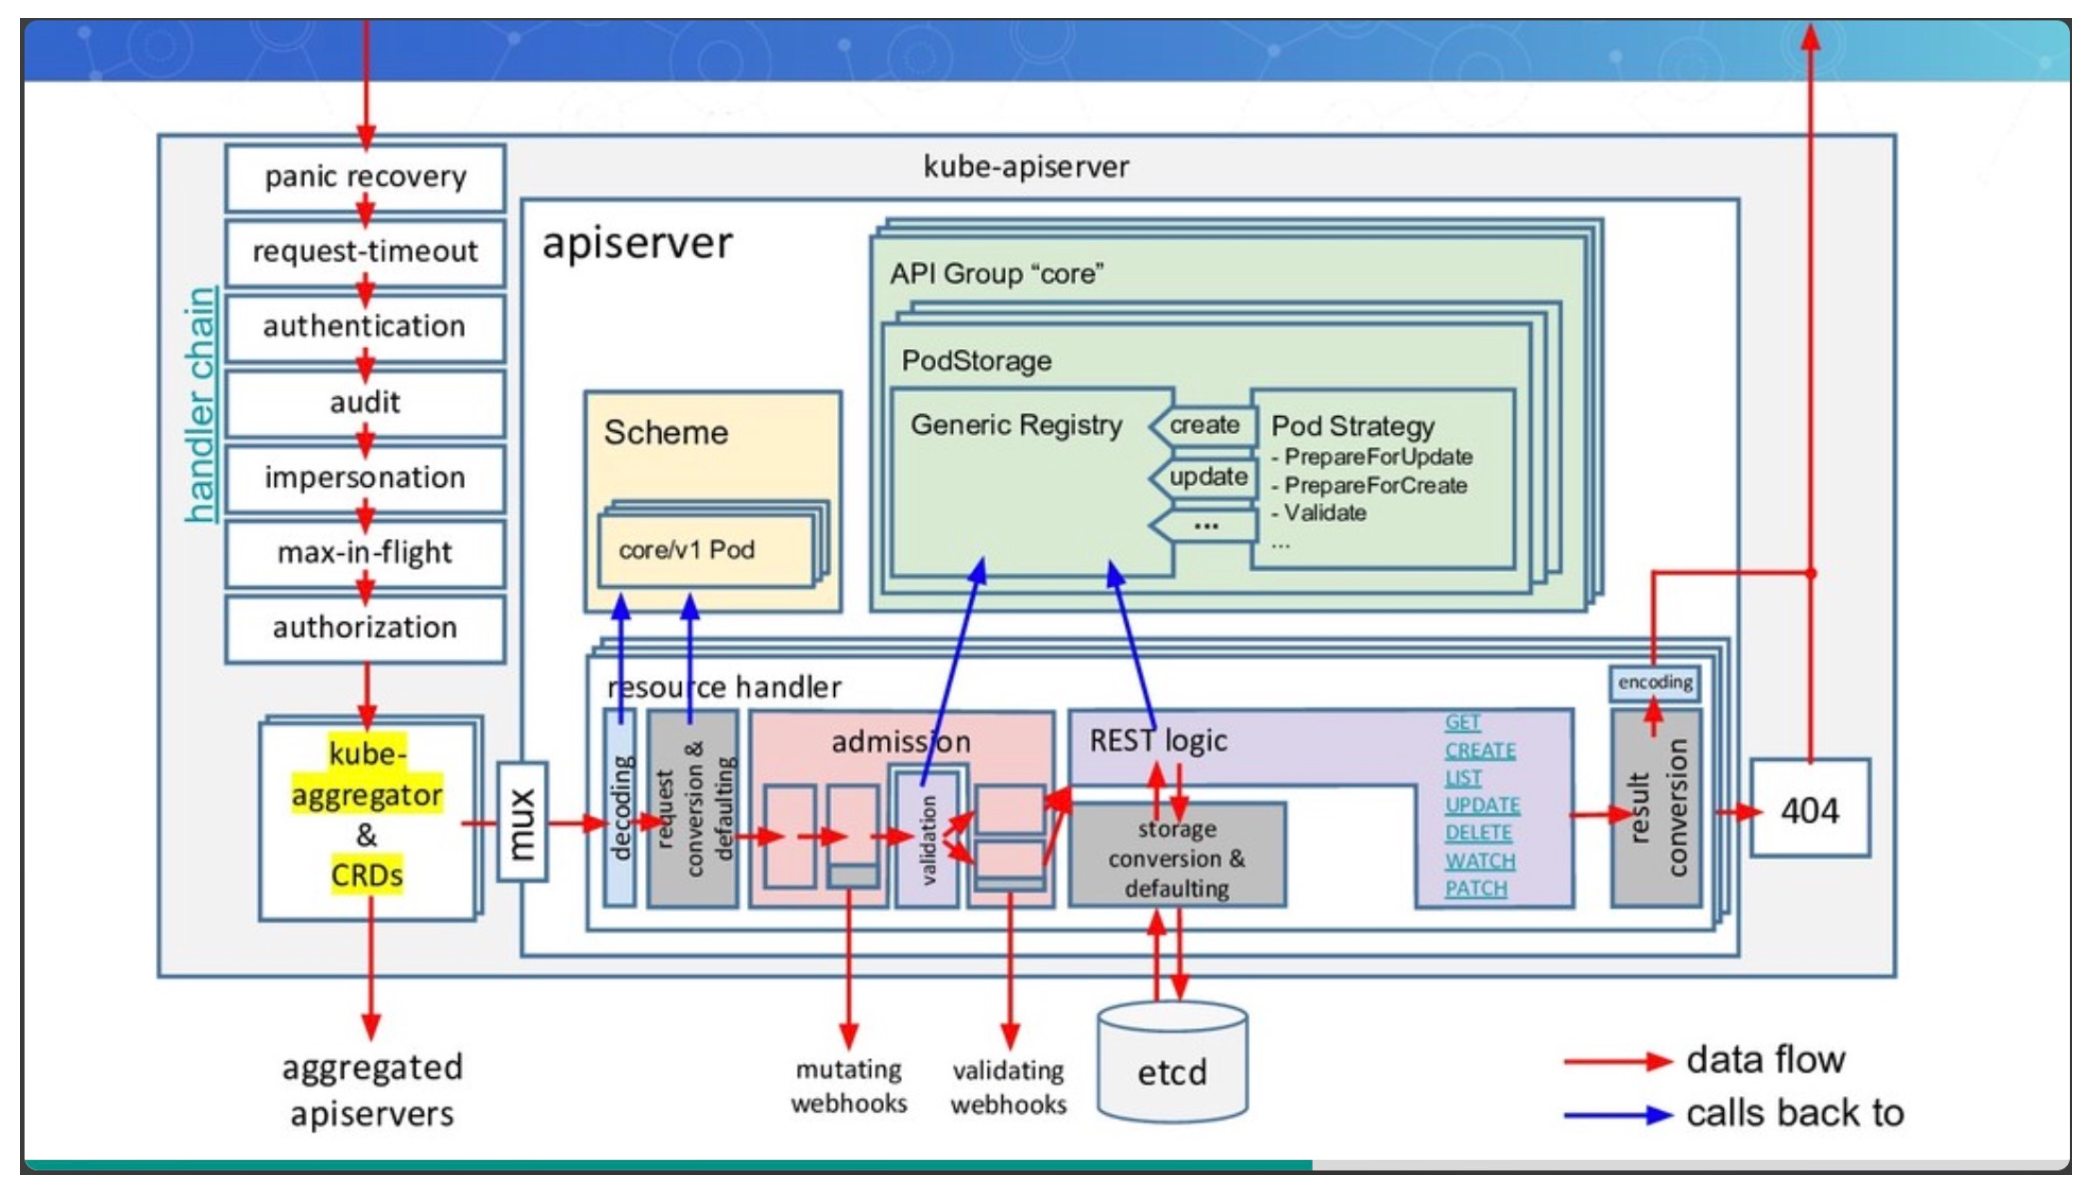
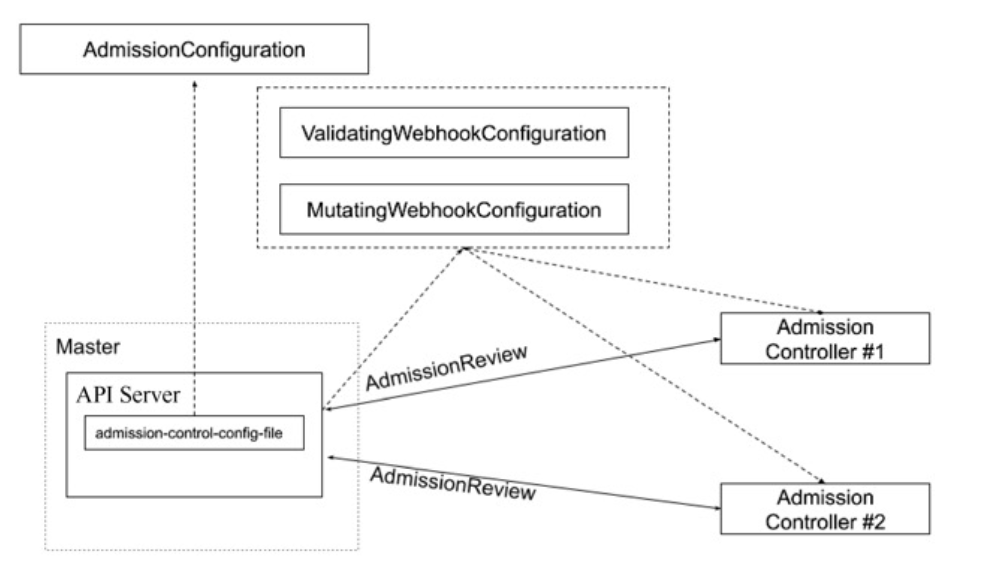
# kube-apiserver --help
--admission-control strings
Admission is divided into two phases. In the first phase, only mutating admission plugins run. In the second phase,
only validating admission plugins run. The names in the below list may represent a validating plugin, a mutating
plugin, or both. The order of plugins in which they are passed to this flag does not matter. Comma-delimited list
of: AlwaysAdmit, AlwaysDeny, AlwaysPullImages, DefaultStorageClass, DefaultTolerationSeconds, DenyEscalatingExec,
DenyExecOnPrivileged, EventRateLimit, ExtendedResourceToleration, ImagePolicyWebhook,
LimitPodHardAntiAffinityTopology, LimitRanger, MutatingAdmissionWebhook, NamespaceAutoProvision, NamespaceExists,
NamespaceLifecycle, NodeRestriction, OwnerReferencesPermissionEnforcement, PersistentVolumeClaimResize,
PersistentVolumeLabel, PodNodeSelector, PodPreset, PodSecurityPolicy, PodTolerationRestriction, Priority,
ResourceQuota, RuntimeClass, SecurityContextDeny, ServiceAccount, StorageObjectInUseProtection,
TaintNodesByCondition, ValidatingAdmissionWebhook. (DEPRECATED: Use --enable-admission-plugins or
--disable-admission-plugins instead. Will be removed in a future version.)
--admission-control-config-file string
File with admission control configuration.
--disable-admission-plugins strings
admission plugins that should be disabled although they are in the default enabled plugins list
(NamespaceLifecycle, LimitRanger, ServiceAccount, TaintNodesByCondition, Priority, DefaultTolerationSeconds,
DefaultStorageClass, StorageObjectInUseProtection, PersistentVolumeClaimResize, MutatingAdmissionWebhook,
ValidatingAdmissionWebhook, RuntimeClass, ResourceQuota). Comma-delimited list of admission plugins: AlwaysAdmit,
AlwaysDeny, AlwaysPullImages, DefaultStorageClass, DefaultTolerationSeconds, DenyEscalatingExec,
DenyExecOnPrivileged, EventRateLimit, ExtendedResourceToleration, ImagePolicyWebhook,
LimitPodHardAntiAffinityTopology, LimitRanger, MutatingAdmissionWebhook, NamespaceAutoProvision, NamespaceExists,
NamespaceLifecycle, NodeRestriction, OwnerReferencesPermissionEnforcement, PersistentVolumeClaimResize,
PersistentVolumeLabel, PodNodeSelector, PodPreset, PodSecurityPolicy, PodTolerationRestriction, Priority,
ResourceQuota, RuntimeClass, SecurityContextDeny, ServiceAccount, StorageObjectInUseProtection,
TaintNodesByCondition, ValidatingAdmissionWebhook. The order of plugins in this flag does not matter.
--enable-admission-plugins strings
admission plugins that should be enabled in addition to default enabled ones (NamespaceLifecycle, LimitRanger,
ServiceAccount, TaintNodesByCondition, Priority, DefaultTolerationSeconds, DefaultStorageClass,
StorageObjectInUseProtection, PersistentVolumeClaimResize, MutatingAdmissionWebhook, ValidatingAdmissionWebhook,
RuntimeClass, ResourceQuota). Comma-delimited list of admission plugins: AlwaysAdmit, AlwaysDeny, AlwaysPullImages,
DefaultStorageClass, DefaultTolerationSeconds, DenyEscalatingExec, DenyExecOnPrivileged, EventRateLimit,
ExtendedResourceToleration, ImagePolicyWebhook, LimitPodHardAntiAffinityTopology, LimitRanger,
MutatingAdmissionWebhook, NamespaceAutoProvision, NamespaceExists, NamespaceLifecycle, NodeRestriction,
OwnerReferencesPermissionEnforcement, PersistentVolumeClaimResize, PersistentVolumeLabel, PodNodeSelector,
PodPreset, PodSecurityPolicy, PodTolerationRestriction, Priority, ResourceQuota, RuntimeClass, SecurityContextDeny,
ServiceAccount, StorageObjectInUseProtection, TaintNodesByCondition, ValidatingAdmissionWebhook. The order of
plugins in this flag does not matter.

准入插件的开发

除默认的准入控制插件以外,Kubernetes 预留了准入控制插件的扩展点,用户可自定义准入控制插件实现自定义准入功能

  • MutatingWebhookConfigurat:变形插件,支持对准入对象的修改
  • ValidatingWebhookConfiguration:校验插件,只能对准入对象合法性进行校验,不能修改

image-20240117164936287

当在 API Server 上启用 --admission-control,会将 AdmissionReview 转发到对应 Admission Controller 上,返回的准入控制结果如果经过变形或者校验插件,直接更新到对象的 annotation 上,例如 Pod

准入控制案例

为资源增加自定义属性

  • 作为多租户集群方案中的一环,我们需要在 namespace 的准入控制中,获取用户信息,并将用户信息更新的 namespace 的 annotation

只有当 namespace 中有有效用户信息时,才可以在 namespace 创建时,自动绑定用户权限,namespace 才可用。

kubectl get mutatingwebhookconfigurations.admissionregistration.k8s.io

1
2
3
4
5
6
7
8
9
10
11
12
13
14
15
16
17
18
19
20
21
22
23
# {{if eq .k8snode_validating "enabled"}}
apiVersion: admissionregistration.k8s.io/v1beta1
kind: MutatingWebhookConfiguration
metadata:
name: ns-mutating.webhook.k8s.io
webhooks:
- clientConfig:
caBundle: {{.serverca_base64}}
url: https://admission.local.tess.io/apis/admissio n.k8s.io/v1alpha1/ ns-mutating
failurePolicy: Fail
name: ns-mutating.webhook.k8s.io
namespaceSelector: {}
rules:
- apiGroups:
- ""
apiVersions:
- '*'
operations:
- CREATE
resources:
- nodes
sideEffects: Unknown
# {{end}}

示例:

1
2
3
4
5
6
7
8
9
10
11
12
13
14
15
16
17
18
19
20
21
22
23
24
25
26
27
28
29
30
31
32
33
34
35
36
37
38
39
40
41
42
43
44
45
46
47
48
49
50
51
52
53
54
55
56
57
58
59
60
61
62
63
64
65
66
67
apiVersion: apps/v1
kind: Deployment
metadata:
name: webhook-server
namespace: webhook-demo
labels:
app: webhook-server
spec:
replicas: 1
selector:
matchLabels:
app: webhook-server
template:
metadata:
labels:
app: webhook-server
spec:
securityContext:
runAsNonRoot: true
runAsUser: 1234
containers:
- name: server
image: cncamp/admission-controller-webhook-demo:latest
imagePullPolicy: Always
ports:
- containerPort: 8443
name: webhook-api
volumeMounts:
- name: webhook-tls-certs
mountPath: /run/secrets/tls
readOnly: true
volumes:
- name: webhook-tls-certs
secret:
secretName: webhook-server-tls
---
apiVersion: v1
kind: Service
metadata:
name: webhook-server
namespace: webhook-demo
spec:
selector:
app: webhook-server
ports:
- port: 443
targetPort: webhook-api
---
apiVersion: admissionregistration.k8s.io/v1
kind: MutatingWebhookConfiguration
metadata:
name: demo-webhook
webhooks:
- name: webhook-server.webhook-demo.svc
sideEffects: None
admissionReviewVersions: ["v1", "v1beta1"]
clientConfig:
service:
name: webhook-server
namespace: webhook-demo
path: "/mutate"
caBundle: ${CA_PEM_B64}
rules:
- operations: [ "CREATE" ]
apiGroups: [""]
apiVersions: ["v1"]
resources: ["pods"]

限流

计数器固定窗口算法

原理就是对一段固定时间窗口内的请求进行计数,如果请求超过了阈值,则舍弃该请求;

如果没有达到设定的阈值,则接受该请求,且计数 +1.

当时间窗口结束时,重置计数器为 0.

image-20240117172551578

这个算法不精确,在某个时间节点流量非常大,第二个窗口也非常大,起不到限流效果。

计数器滑动窗口算法

在固定窗口的基础上,将一个计时窗口分成了若干个小窗口,然后每个小窗口维护一个独立的计数器。

当请求的时间大于当前窗口的最大时间时,则将计时窗口向前平移一个小窗口。

平移时,将第一个小窗口的数据丢弃,然后将第二个小窗口设置为第一个小窗口,同时在最后面新增一个小窗口,将新的请求放在新增的小窗口中。

同时要保证整个窗口中所有小窗口的请求数目之后不能超过设定的阈值。

image-20240117172909954

这个算法不准确,一样会出现两个窗口峰值

漏斗算法

漏斗算法的原理也很容易理解。请求来了之后,会首先进到漏斗里,然后漏斗以恒定的速率将请求流出进行处理,从而起到平滑流量的作用。

当请求的流量过大时,漏斗达到最大容量时会溢出,此时请求被丢弃。

在系统看来,请求永远是以平滑的传输速率过来,从而起到了保护系统的作用。

image-20240117173135949

令牌桶算法

令牌桶算法时对漏斗算法的一种改进,出了能够起到限流的作用外,还允许一定程度的流量突发。

在令牌桶算法中,存在一个令牌桶,算法中存在一种机制以恒定的速率向令牌桶中放入令牌。

令牌桶也有一定的容量,如果满了令牌就无法放进去了。

当请求来时,会首先到令牌桶中去拿令牌

  • 如果拿到了令牌,则该请求会被处理,并消耗拿到的令牌;
  • 如果令牌桶为空,则该请求会被丢弃。

image-20240117173434981

APIServer 中的限流

max-requests-inflight:在给定时间内的最大 non-mutating 请求数

max-mutating-requests-inflight:在给定时间内的最大 mutating 请求数,调整 apiserver 的流控 qos

默认值 节点数1000-3000 节点数>3000
max-requests-inflight 400 1500 3000
max-mutating-requests-inflight 200 500 1000

Kubernetes 代码线代码位置:

staging/src/k8s.io/apiserver/pkg/server/filters/maxinflight.go

1
2
3
4
5
6
7
8
9
10
11
12
13
14
15
16
17
18
19
20
21
22
23
24
25
26
27
28
29
30
31
32
33
34
35
36
37
38
39
40
41
42
43
44
45
46
47
48
49
50
51
52
53
54
55
56
57
58
59
60
61
62
63
64
65
66
67
68
69
70
71
72
73
74
75
76
77
78
79
80
81
82
83
84
85
86
87
88
89
90
91
92
// WithMaxInFlightLimit limits the number of in-flight requests to buffer size of the passed in channel.
func WithMaxInFlightLimit(
handler http.Handler,
nonMutatingLimit int,
mutatingLimit int,
longRunningRequestCheck apirequest.LongRunningRequestCheck,
) http.Handler {
if nonMutatingLimit == 0 && mutatingLimit == 0 {
return handler
}
var nonMutatingChan chan bool
var mutatingChan chan bool
if nonMutatingLimit != 0 {
nonMutatingChan = make(chan bool, nonMutatingLimit)
klog.V(2).InfoS("Initialized nonMutatingChan", "len", nonMutatingLimit)
} else {
klog.V(2).InfoS("Running with nil nonMutatingChan")
}
if mutatingLimit != 0 {
mutatingChan = make(chan bool, mutatingLimit)
klog.V(2).InfoS("Initialized mutatingChan", "len", mutatingLimit)
} else {
klog.V(2).InfoS("Running with nil mutatingChan")
}
initMaxInFlight(nonMutatingLimit, mutatingLimit)

return http.HandlerFunc(func(w http.ResponseWriter, r *http.Request) {
ctx := r.Context()
requestInfo, ok := apirequest.RequestInfoFrom(ctx)
if !ok {
handleError(w, r, fmt.Errorf("no RequestInfo found in context, handler chain must be wrong"))
return
}

// Skip tracking long running events.
if longRunningRequestCheck != nil && longRunningRequestCheck(r, requestInfo) {
handler.ServeHTTP(w, r)
return
}

var c chan bool
isMutatingRequest := !nonMutatingRequestVerbs.Has(requestInfo.Verb)
if isMutatingRequest {
c = mutatingChan
} else {
c = nonMutatingChan
}

if c == nil {
handler.ServeHTTP(w, r)
} else {

select {
case c <- true:
// We note the concurrency level both while the
// request is being served and after it is done being
// served, because both states contribute to the
// sampled stats on concurrency.
if isMutatingRequest {
watermark.recordMutating(len(c))
} else {
watermark.recordReadOnly(len(c))
}
defer func() {
<-c
if isMutatingRequest {
watermark.recordMutating(len(c))
} else {
watermark.recordReadOnly(len(c))
}
}()
handler.ServeHTTP(w, r)

default:
// at this point we're about to return a 429, BUT not all actors should be rate limited. A system:master is so powerful
// that they should always get an answer. It's a super-admin or a loopback connection.
if currUser, ok := apirequest.UserFrom(ctx); ok {
for _, group := range currUser.GetGroups() {
if group == user.SystemPrivilegedGroup {
handler.ServeHTTP(w, r)
return
}
}
}
// We need to split this data between buckets used for throttling.
metrics.RecordDroppedRequest(r, requestInfo, metrics.APIServerComponent, isMutatingRequest)
metrics.RecordRequestTermination(r, requestInfo, metrics.APIServerComponent, http.StatusTooManyRequests)
tooManyRequests(r, w, retryAfter)
}
}
})
}

传统限流方法的局限性

  • 粒度粗
    • 无法为不同用户,不同场景设置不同的限流
  • 单队列
    • 共享限流窗口/桶,一个坏用户可能会将整个系统堵塞,其他正常用户的请求无法被及时处理
  • 不公平
    • 正常用户的请求会被排到队尾,无法及时处理而饿死
  • 无优先级
    • 重要的系统指令一并被限流,系统故障难以恢复

API Priority and Fairness

在 Kubernetes v1.18 版本之后,引入优先级和公平性

  • APF 以更细粒度的方式对请求进行分类和隔离
  • 它还引入了空间有限的排队机制,因此在非常短暂的突发情况下,API 服务器不会拒绝任何请求
  • 通过使用公平排队技术从队列中分发请求,这样,一个行为不佳的控制器就不会饿死其他控制器(即使优先级相同)
  • APF 的核心
    • 多等级
    • 多队列

image-20240117174933551

不同的等级划分为不同的 Flow,当某个请求阻塞,不影响其他的 Flow。

  • APF 的实现依赖两个非常重要的资源 FlowSchema, PriorityLevelConfiguration
  • APF 对请求进行更细粒度的分类,每一个请求分类对应一个 FlowSchema(FS)
  • FS 内的请求又会根据 distinguisher 进一步划分为不同的 Flow
  • FS 会设置一个优先级(Priority Level,PL),不同优先级的并发资源是隔离的。所以不同优先级的资源不会被互相排挤。特定优先级的请求可以被高优处理。
  • 一个 PL 可以对应多个 FS,PL 中维护了一个 QueueSet,用于缓存不能及时处理的请求,请求不会因为超出 PL 的并发限制而被丢弃。
  • FS 中的每个 Flow 通过 shuffle sharding 算法从 QueueSet 选取特定的 queues 缓存请求
  • 每次从 QueueSet 中取请求执行时,会先应用 fair queuing 算法从 QueueSet 中选中一个 queue,然后从这个 queue 中取出 oldest 请求执行。所以即使是同一个 PL 内的请求,也不会出现一个 Flow 内的请求一直占用资源的不公平现象。

概念

  • 传入的请求,通过 FlowSchema 按照其属性分类,并分配优先级
  • 每个优先级维护自定义的并发限制,加强了隔离度,这样不同优先级的请求,就不会相互饿死
  • 在同一个优先级内,公平排队算法可以防止不同 flow 的请求相互饿死
  • 该算法将请求排队,通过排队机制,防止在平均负载较低时,通信量突增而导致请求失败

优先级

  • 如果未启用 APF,API 服务器中的整体并发量将受到 kube-apiserver 的参数 --max-requests-inflight--max-mutating-requests-inflight 的限制
  • 启用 APF 后,将对这些参数定义的并发限制进行求和,然后将总和分配到一组可配置的优先级中。每个传入的请求都会分配一个优先级;
  • 每个优先级都有各自的配置,设定允许分发的并发请求数;
  • 例如,默认配置包括针对领导者选举请求、内置控制器请求和 Pod 请求都单独设置优先级。这表示即使异常的 Pod 向 API 服务器发送大量请求,也无法阻止领导者选举或内置控制器的操作执行成功;

排队

  • 即使在同一优先级内,也可能存在大量不同的流量源
  • 在过载的情况下,防止一个请求流饿死其他流是非常有价值的(尤其是在一个较为常见的场景中,一个有故障的客户端会疯狂地向 kube-apiserver 发送请求,理想情况下,这个有故障的客户端不应对其他客户端产生太大的影响)
  • 公平排队算法在处理具有相同优先级的请求时,实现了上述场景
  • 每个请求都被分配到某个 流(Flow) 中,该流由对应的 FlowSchema 的名字加上一个 流区分项(FlowDistinguisher)来标识
  • 这里的流区分项可以是发出请求的用户、目标资源的名称空间或什么都不是
  • 系统尝试为不同流中具有相同优先级的请求赋予近似相等的权重
  • 将请求划分到流中之后,API 功能将请求分配到队列中
  • 分配时使用一种称为 混洗分片(Shuffle-Sharding)的技术。该技术可以相对有效地利用队列隔离低强度流于高强度流
  • 排队算法的细节可针对每个优先等级进行调整,并允许管理员在内存占用、公平性(当总流量超标时,各个独立的流将都会取得进展)、突发流量的容忍度以及排队引发的额外延迟之间进行权衡

豁免请求

某些特别重要的请求不受制于此特性施加的任何限制。

这些豁免可防止不当的流控配置完全禁用 API 服务器。

优先级默认配置

  • system
    • 用于 system:nodes 组(即 kubelets )的请求;kuberlets 必须能连上 API 服务器,以便工作负载能够调度到其上
  • leader-election
    • 用于内置控制器的领导选举的请求(特别是来自 kube-system 名称空间中 system:kube-controller-managersystem:kube-scheduler 用户和服务账号,针对 endpointsconfigmapsleases 的请求)。
    • 将这些请求与其他流量相隔离非常重要,因为领导者选举失败会导致控制器发生故障并重新启动,这反过来会导致新启动的控制器在同步信息时,流量开销更大
  • workload-high
    • 优先级用于内置控制器的请求
  • workload-low
    • 优先级适用于来自任何服务账号的请求,通常包括来自 Pods 中运行的控制器的所有请求
  • global-default
    • 优先级可处理所有其他流量,例如:非特权用户运行的交互式 kubectl 命令
  • exempt
    • 优先级的请求完全不受流控限制:它们总是立刻被分发。特殊的 exempt FlowSchemasystem:masters 组的所有请求都归入该优先级组
  • catch-all
    • 优先级与特殊的 catch-all FlowSchema 结合使用,以确保每个请求都分类
    • 一般不应依赖于 catch-all 的配置,而应适当地创建自己的 catch-all FlowSchemaPriorityLevelConfigurations(或使用默认安装的 global-default 配置)
    • 为了帮助捕获部分请求未分类的配置错误,强制要求 catch-all 优先级仅允许 5 个并发份额,并且不对请求进行排队,使得仅与 catch-all FlowSchema 匹配的流量被拒绝的可能性更高,并显示 HTTP 429 错误。

PriorityLevelConfiguration

一个 PriorityLevelConfiguration 表示单个隔离类型。

每个 PriorityLevelConfigurations 对未完成的请求数有各自的限制,对排队中的请求数也有限制。

1
2
3
4
5
6
7
8
9
10
# kubectl  get prioritylevelconfigurations.flowcontrol.apiserver.k8s.io
NAME TYPE NOMINALCONCURRENCYSHARES QUEUES HANDSIZE QUEUELENGTHLIMIT AGE
catch-all Limited 5 <none> <none> <none> 6d12h
exempt Exempt <none> <none> <none> <none> 6d12h
global-default Limited 20 128 6 50 6d12h
leader-election Limited 10 16 4 50 6d12h
node-high Limited 40 64 6 50 6d12h
system Limited 30 64 6 50 6d12h
workload-high Limited 40 128 6 50 6d12h
workload-low Limited 100 128 6 50 6d12h
1
2
3
4
5
6
7
8
9
10
11
12
13
14
15
16
17
18
19
20
21
22
23
# kubectl get prioritylevelconfigurations.flowcontrol.apiserver.k8s.io global-default -o yaml
apiVersion: flowcontrol.apiserver.k8s.io/v1
kind: PriorityLevelConfiguration
metadata:
annotations:
apf.kubernetes.io/autoupdate-spec: "true"
creationTimestamp: "2024-01-11T13:00:16Z"
generation: 1
name: global-default
resourceVersion: "35"
uid: 3c04ba32-58a1-45fd-a09e-1a9c93a65667
spec:
limited:
lendablePercent: 50
limitResponse:
queuing:
handSize: 6 # shuffle sharding 的配置,每个flowschema+distinguisher的请求会被enqueue到多少个对列
queueLengthLimit: 50 # 每个队列中的对象数量
queues: 128 # 当前PriorityLevel的队列总数
type: Queue
nominalConcurrencyShares: 20 # 允许的并发请求
type: Limited
status: {}

FlowSchema

FlowSchema 匹配一些入站请求,并将它们分配给优先级。

每个入站请求都会对所有 FlowSchema 测试是否匹配,首先从 matchingPrecedence 数值最低的匹配开始(我们认为这是逻辑上匹配度最高),然后依次进行,直到首个匹配出现。

1
2
3
4
5
6
7
8
9
10
11
12
13
14
15
# kubectl  get flowschemas.flowcontrol.apiserver.k8s.io
NAME PRIORITYLEVEL MATCHINGPRECEDENCE DISTINGUISHERMETHOD AGE MISSINGPL
exempt exempt 1 <none> 6d13h False
probes exempt 2 <none> 6d13h False
system-leader-election leader-election 100 ByUser 6d13h False
endpoint-controller workload-high 150 ByUser 6d13h False
workload-leader-election leader-election 200 ByUser 6d13h False
system-node-high node-high 400 ByUser 6d13h False
system-nodes system 500 ByUser 6d13h False
kube-controller-manager workload-high 800 ByNamespace 6d13h False
kube-scheduler workload-high 800 ByNamespace 6d13h False
kube-system-service-accounts workload-high 900 ByNamespace 6d13h False
service-accounts workload-low 9000 ByUser 6d13h False
global-default global-default 9900 ByUser 6d13h False
catch-all catch-all 10000 ByUser 6d13h False
1
2
3
4
5
6
7
8
9
10
11
12
13
14
15
16
17
18
19
20
21
22
23
24
25
26
27
28
29
30
31
32
33
34
35
36
37
38
39
40
41
42
43
44
45
# kubectl get flowschemas.flowcontrol.apiserver.k8s.io kube-scheduler -o yaml
apiVersion: flowcontrol.apiserver.k8s.io/v1
kind: FlowSchema
metadata:
annotations:
apf.kubernetes.io/autoupdate-spec: "true"
creationTimestamp: "2024-01-11T13:00:17Z"
generation: 1
name: kube-scheduler # FlowSchema名
resourceVersion: "57"
uid: a5dfa5c1-bc65-4d6a-b073-3f3e6d271af8
spec:
distinguisherMethod:
type: ByNamespace # Distinguisher。由 FlowSchema名和 Distinguisher 确定一个 flow
matchingPrecedence: 800 # 规则优先级
priorityLevelConfiguration: # 对应的队列优先级
name: workload-high
rules:
- nonResourceRules:
- nonResourceURLs:
- '*'
verbs:
- '*'
resourceRules:
- apiGroups:
- '*'
clusterScope: true
namespaces:
- '*'
resources: # 对应的资源和请求类型
- '*'
verbs:
- '*'
subjects:
- kind: User
user:
name: system:kube-scheduler
status:
conditions:
- lastTransitionTime: "2024-01-11T13:00:17Z"
message: This FlowSchema references the PriorityLevelConfiguration object named
"workload-high" and it exists
reason: Found
status: "False"
type: Dangling

调试

获取优先级及其当前状态的列表

1
2
3
4
5
6
7
8
9
10
# kubectl get --raw /debug/api_priority_and_fairness/dump_priority_levels
PriorityLevelName, ActiveQueues, IsIdle, IsQuiescing, WaitingRequests, ExecutingRequests, DispatchedRequests, RejectedRequests, TimedoutRequests, CancelledRequests
catch-all, 0, true, false, 0, 0, 38, 0, 0, 0
exempt, 0, true, false, 0, 0, 3228, 0, 0, 0
global-default, 0, false, false, 0, 1, 82, 0, 0, 0
leader-election, 0, true, false, 0, 0, 3839, 0, 0, 0
node-high, 0, true, false, 0, 0, 399, 0, 0, 0
system, 0, true, false, 0, 0, 202, 0, 0, 0
workload-high, 0, true, false, 0, 0, 907, 0, 0, 0
workload-low, 0, true, false, 0, 0, 10, 0, 0, 0

查看队列及其当前状态的列表

1
2
3
4
5
6
7
# kubectl get --raw /debug/api_priority_and_fairness/dump_queues
PriorityLevelName, Index, PendingRequests, ExecutingRequests, SeatsInUse, NextDispatchR, InitialSeatsSum, MaxSeatsSum, TotalWorkSum
workload-high, 0, 0, 0, 0, 0.00000000ss, 0, 0, 0.00000000ss
workload-high, 1, 0, 0, 0, 0.00000000ss, 0, 0, 0.00000000ss
workload-high, 2, 0, 0, 0, 0.00000000ss, 0, 0, 0.00000000ss
workload-high, 3, 0, 0, 0, 0.00000000ss, 0, 0, 0.00000000ss
...

当前正在队列中等待的所有请求的列表

1
2
3
# kubectl get --raw /debug/api_priority_and_fairness/dump_requests
PriorityLevelName, FlowSchemaName, QueueIndex, RequestIndexInQueue, FlowDistingsher, ArriveTime, InitialSeats, FinalSeats, AdditionalLatency, StartTime
global-default, global-default, 5, -1, kubernetes-admin, 2024-01-18T06:19:07.260666899Z, 1, 0, 0s, 2024-01-18T06:19:07.260686264Z

APIServer 对象的实现

高可用 APIServer

启动 apiserver 实例(作为一个独立的进程)

1
2
3
4
5
6
7
8
9
10
11
12
13
14
15
16
17
18
19
20
21
22
23
24
25
26
27
28
29
kube-apiserver \
--advertise-address=192.168.239.128 \
--allow-privileged=true \
--authorization-mode=Node,RBAC \
--client-ca-file=/etc/kubernetes/pki/ca.crt \
--enable-admission-plugins=NodeRestriction \
--enable-bootstrap-token-auth=true \
--etcd-cafile=/etc/kubernetes/pki/etcd/ca.crt \
--etcd-certfile=/etc/kubernetes/pki/apiserver-etcd-client.crt \
--etcd-keyfile=/etc/kubernetes/pki/apiserver-etcd-client.key \
--etcd-servers=https://127.0.0.1:2379 \
--kubelet-client-certificate=/etc/kubernetes/pki/apiserver-kubelet-client.crt \
--kubelet-client-key=/etc/kubernetes/pki/apiserver-kubelet-client.key \
--kubelet-preferred-address-types=InternalIP,ExternalIP,Hostname \
--proxy-client-cert-file=/etc/kubernetes/pki/front-proxy-client.crt \
--proxy-client-key-file=/etc/kubernetes/pki/front-proxy-client.key \
--requestheader-allowed-names=front-proxy-client \
--requestheader-client-ca-file=/etc/kubernetes/pki/front-proxy-ca.crt \
--requestheader-extra-headers-prefix=X-Remote-Extra- \
--requestheader-group-headers=X-Remote-Group \
--requestheader-username-headers=X-Remote-User \
# 改为新端口,不与本地端口冲突
--secure-port=6444 \
--service-account-issuer=https://kubernetes.default.svc.cluster.local \
--service-account-key-file=/etc/kubernetes/pki/sa.pub \
--service-account-signing-key-file=/etc/kubernetes/pki/sa.key \
--service-cluster-ip-range=10.1.0.0/16 \
--tls-cert-file=/etc/kubernetes/pki/apiserver.crt \
--tls-private-key-file=/etc/kubernetes/pki/apiserver.key

构建高可用的多副本 apiserver

apiserver 是无状态的 Reset Server

无状态所以方便 Scale up/down

负载均衡

  • 在多个 apiserver 实例之上,配置负载均衡
  • 证书可能需要加上 Loadbalancer VIP 重新生成

预留充足的 CPU、内存资源

随着集群中节点数量不断增多,APIServer 对 CPU 和内存的开销也不断增大。过少的 CPU 资源会降低其处理效率,过少的内存资源会导致 Pod 被 OOMKilled,直接导致服务不可用。在规划 APIServer 资源时,不能仅看当下需求,也要为未来预留充分。

使用 kubelet 启动 apiserver 可以通过 k8s 携带的探活保障服务异常时自动启动。

善用速率限制(RateLimit)

APIServer 的参数 --max-mutating-requests-inflight 支持在给定时间内限制并行处理读请求(包括 Get、List 和 Watch 操作)和写请求(包括 Create、Delete、Update 和 Patch 操作)的最大数量。

当 APIServer 接收到的请求超过这两个参数设定的值时,再接收到的请求将会被直接拒绝。

通过速率限制机制,可以有效地控制 APIServer 内存的使用。

如果该配置过低,会经常出现请求超过限制的错误,如果配置过高,则 APIServer 可能会因为占用过多内存而被强制终止,因此需要根据实际的运行环境,结合实时用户请求数量和 APIServer 的资源配置进行调优。

客户端在接收到拒绝请求的返回值后,应等待一段时间再发起重试,无间隔的重试会加重 APISerer 的压力,导致性能进一步降低。针对并行处理请求数的过滤颗粒度太大,在请求数量比较多的场景,重要的消息可能会被拒绝掉,自 1.18 版本开始,社区引入了优先级和公平保证(Priority and Fairness)功能,以提供更细粒度地客户端请求控制。该功能支持将不同用户或不同类型的请求进行优先级归类,保证高优先级的请求总是能够更快得到处理,从而不受低优先级请求的影响。

设置合适的缓存大小

APIServer 与 etcd 之间基于 gRPC 协议进行通信,gRPC 协议保证了二者在大规模集群中的数据高速传输。gRPC 基于连接复用的 HTTP/2 协议,即针对相同分组的对象,APIServer 和 etcd 之间共享相同的 TCP 连接,不同请求由不同的 stream 传输。

一个 HTTP/2 连接有其 stream 配额,配额的大小限制了能支持的并发请求。APIServer 提供了集群对象的缓存机制,当客户端发起查询请求时,APIServer 默认会将其缓存(新数据覆盖老数据)直接返回给客户端。

缓存区大小可以通过参数 --watch-cache-sizes 设置。针对访问请求比较多的对象,适当设置缓存的大小,极大降低对 etcd 的访问频率,节省了网络调用,降低了对 etcd 集群的读写压力,从而提高对象访问的性能。

写入操作会直接写入 etcd,读取操作会先从缓存中读取。

但是 APIServer 也是允许客户端忽略缓存的,例如客户端请求中 ListOption 中没有设置 resourceVersion,这时 APIServer 直接从 etcd 拉取最新数据返回给客户端。客户端应尽量避免此操作,应在 ListOption 中设置 resourceVersion 为0,APIServer 则将从缓存里读取数据,而不会直接访问 etcd

客户端尽量使用长连接

当查询请求的返回数据较大且此类请求并发量较大时,容易引发 TCP 链路的阻塞,导致其他查询操作超时。

因此基于 Kubernetes 开发组件时,例如某些 DaemonSet 和 Controller,如果要查询某类对象,应尽量通过长连接 ListWatch 监听对象变更,避免全量从 APIServer 获取资源。(当资源出现变更,使用监听传输的数据很少,增量传输。但是单独获取可能出现 apiserveretcd 中全量获取,过滤之后返回给调用端)

如果在同一应用程序中,如果有多个 Informer 监听 APIServer 资源变化,可以将这些 Informer 合并,减少和 APIServer 的长连接数,从而降低对 APIServer 的压力。

访问 APIServer

对外部客户(userclientadmin),永远只通过 LoadBalancer 访问。

只有当负载均衡出现故障时,管理员才切换到 apiserver IP 进行管理。

内部客户端,优先访问 Cluster IP,重要情况下,直接访问 apiserver IP,不重要则使用 LB。但是 Kubernetes 组件最好统一使用同一个入口,避免出现异常的时候,组件表现出不一致的现象。

Client type 外部LB VIP serviec cluster IP apiserver IP
Internal Y Y Y
External Y N Y

搭建多租户的 Kubernetes 集群

授信

  • 认证
    • 禁止匿名访问,只允许可信用户做操作
  • 授权
    • 基于授信的操作,防止多用户之间相互影响,比如普通用户删除 Kubernetes 核心服务,或者 A 用户删除或修改 B 用户的应用(基于鉴权,分隔用户权限)

隔离

  • 可见行隔离
    • 用户只关心自己的应用,无需看到其他用户的服务和部署
  • 资源隔离
    • 有些关键项目对资源需求较高,需要专有设备,不与其他人共享
  • 应用访问隔离
    • 用户创建的服务,按既定规则允许其他用户访问

资源管理

  • Quota 管理
    • 针对不同用户,设置资源限制

认证

与企业现有认证系统集成

  • 很多企业基于 Microsoft Active Directory 提供认证服务

选择认证插件

  • 选择 webhook 作为认证插件
  • 选择 Keystone 作为认证插件,以 Microsoft AD 作为 backend 搭建 keystone 服务

一旦认证完成,Kubernetes 即可获取当前用户信息(主要是用户名),并针对该用户做授权。授权和准入控制完成后,该用户的请求完成。

注册 APIService

将不同的服务注册到 APIServices 中

1
2
3
4
5
6
7
8
9
10
11
12
13
14
15
16
17
18
19
20
21
22
23
# kubectl get apiservices.apiregistration.k8s.io
NAME SERVICE AVAILABLE AGE
v1. Local True 76m
v1.admissionregistration.k8s.io Local True 76m
v1.apiextensions.k8s.io Local True 76m
v1.apps Local True 76m
v1.authentication.k8s.io Local True 76m
v1.authorization.k8s.io Local True 76m
v1.autoscaling Local True 76m
v1.batch Local True 76m
v1.certificates.k8s.io Local True 76m
v1.coordination.k8s.io Local True 76m
v1.discovery.k8s.io Local True 76m
v1.events.k8s.io Local True 76m
v1.flowcontrol.apiserver.k8s.io Local True 76m
v1.networking.k8s.io Local True 76m
v1.node.k8s.io Local True 76m
v1.policy Local True 76m
v1.rbac.authorization.k8s.io Local True 76m
v1.scheduling.k8s.io Local True 76m
v1.storage.k8s.io Local True 76m
v1beta3.flowcontrol.apiserver.k8s.io Local True 76m
v2.autoscaling Local True 76m
1
2
3
4
5
6
7
8
9
10
11
12
13
14
15
16
17
18
19
20
21
# kubectl get apiservices.apiregistration.k8s.io v1. -o yaml
apiVersion: apiregistration.k8s.io/v1
kind: APIService
metadata:
creationTimestamp: "2024-01-18T05:45:52Z"
labels:
kube-aggregator.kubernetes.io/automanaged: onstart
name: v1.
resourceVersion: "16"
uid: 189a8967-9833-4770-988b-34c22c0fc2c4
spec:
groupPriorityMinimum: 18000
version: v1
versionPriority: 1
status:
conditions:
- lastTransitionTime: "2024-01-18T05:45:52Z"
message: Local APIServices are always available
reason: Local
status: "True"
type: Available

授权

ABAC 有局限性,需要针对每个 account 做配置,并且需要重启 apiserver

RBAC 更灵活,更符合我们通常熟知的权限管理。

针对不同类型用户,规划系统角色,例如 UserSystemAccount

apimachinery

例如要开发一个对象,可以参考 apimachinery 的代码实现

https://github.com/kubernetes/apimachinery

https://github.com/kubernetes/kubernetes/tree/master/staging/src/k8s.io/apimachinery

对象核心内容:GKV

Group:组,区分访问 APIServer 的 stream

Kind:代表 Node 还是 Pod

Version:

  • Internel versionExternal version:前者面向外部调用的用户,后者面向集群之间(集群之间3个版本内兼容)
  • 版本转换(老版本和新版本之间是向前兼容 3 个版本)

定义 Group

pkg/apis/testapigroup/register.go

1
2
3
4
5
6
7
8
9
10
11
12
13
14
15
16
17
18
19
20
21
22
23
24
25
26
27
28
29
30
31
32
33
34
35
36
37
package testapigroup

import (
"k8s.io/apimachinery/pkg/runtime"
"k8s.io/apimachinery/pkg/runtime/schema"
)

// 定义 SchemeBuilder
var (
SchemeBuilder = runtime.NewSchemeBuilder(addKnownTypes)
AddToScheme = SchemeBuilder.AddToScheme
)

// GroupName is the group name use in this package
const GroupName = "testapigroup.apimachinery.k8s.io"

// SchemeGroupVersion is group version used to register these objects
var SchemeGroupVersion = schema.GroupVersion{Group: GroupName, Version: runtime.APIVersionInternal}

// Kind takes an unqualified kind and returns a Group qualified GroupKind
func Kind(kind string) schema.GroupKind {
return SchemeGroupVersion.WithKind(kind).GroupKind()
}

// Resource takes an unqualified resource and returns a Group qualified GroupResource
func Resource(resource string) schema.GroupResource {
return SchemeGroupVersion.WithResource(resource).GroupResource()
}

// 将对象加入SchemeBuild
// Adds the list of known types to the given scheme.
func addKnownTypes(scheme *runtime.Scheme) error {
scheme.AddKnownTypes(SchemeGroupVersion,
&Carp{},
)
return nil
}

定义对象类型 types.go

List:单一对象数据结构

  • TypeMeta
  • ObjectMeta
  • Spec
  • Status

例如 Node 的定义

staging/src/k8s.io/api/core/v1/types.go

1
2
3
4
5
6
7
8
9
10
11
12
13
14
15
16
17
18
19
20
21
// Node is a worker node in Kubernetes.
// Each node will have a unique identifier in the cache (i.e. in etcd).
type Node struct {
metav1.TypeMeta `json:",inline"`
// Standard object's metadata.
// More info: https://git.k8s.io/community/contributors/devel/sig-architecture/api-conventions.md#metadata
// +optional
metav1.ObjectMeta `json:"metadata,omitempty" protobuf:"bytes,1,opt,name=metadata"`

// Spec defines the behavior of a node.
// https://git.k8s.io/community/contributors/devel/sig-architecture/api-conventions.md#spec-and-status
// +optional
Spec NodeSpec `json:"spec,omitempty" protobuf:"bytes,2,opt,name=spec"`

// Most recently observed status of the node.
// Populated by the system.
// Read-only.
// More info: https://git.k8s.io/community/contributors/devel/sig-architecture/api-conventions.md#spec-and-status
// +optional
Status NodeStatus `json:"status,omitempty" protobuf:"bytes,3,opt,name=status"`
}

其中 TypeMeta 的定义:staging/src/k8s.io/apimachinery/pkg/apis/meta/v1/types.go

1
2
3
4
5
6
7
8
9
10
11
12
13
14
15
16
17
18
19
20
21
// TypeMeta describes an individual object in an API response or request
// with strings representing the type of the object and its API schema version.
// Structures that are versioned or persisted should inline TypeMeta.
//
// +k8s:deepcopy-gen=false
type TypeMeta struct {
// Kind is a string value representing the REST resource this object represents.
// Servers may infer this from the endpoint the client submits requests to.
// Cannot be updated.
// In CamelCase.
// More info: https://git.k8s.io/community/contributors/devel/sig-architecture/api-conventions.md#types-kinds
// +optional
Kind string `json:"kind,omitempty" protobuf:"bytes,1,opt,name=kind"`

// APIVersion defines the versioned schema of this representation of an object.
// Servers should convert recognized schemas to the latest internal value, and
// may reject unrecognized values.
// More info: https://git.k8s.io/community/contributors/devel/sig-architecture/api-conventions.md#resources
// +optional
APIVersion string `json:"apiVersion,omitempty" protobuf:"bytes,2,opt,name=apiVersion"`
}

代码生成 Tags

在代码中会有一些 tag

1
2
3
// +genclient
// +genclient:nonNamespaced
// +k8s:deepcopy-gen:interfaces=k8s.io/apimachinery/pkg/runtime.Object

以及在 doc.go

1
2
3
4
5
6
// +k8s:openapi-gen=true
// +k8s:deepcopy-gen=package
// +k8s:protobuf-gen=package

// Package v1 is the v1 version of the core API.
package v1 // import "k8s.io/api/core/v1"

Global Tags

  • 定义在 doc.go

    • // +k8s:deepcopy-gen=package // 深拷贝,包含里面的指针
      
      1
      2
      3
      4
      5
      6
      7
      8
      9
      10

      `Local Tags`

      * 定义在 `types.go` 中的每个对象里

      * ```
      // 生成接口
      // +k8s:deepcopy-gen:interfaces=k8s.io/apimachinery/pkg/runtime.Object


实现 etcd storage

例如操作 configMapetcd 时的策略

pkg/registry/core/configmap/storage/storage.go

1
2
3
4
5
6
7
8
9
10
11
12
13
14
15
16
17
18
19
20
21
22
23
24
// NewREST returns a RESTStorage object that will work with ConfigMap objects.
func NewREST(optsGetter generic.RESTOptionsGetter) (*REST, error) {
store := &genericregistry.Store{
NewFunc: func() runtime.Object { return &api.ConfigMap{} },
NewListFunc: func() runtime.Object { return &api.ConfigMapList{} },
PredicateFunc: configmap.Matcher,
DefaultQualifiedResource: api.Resource("configmaps"),
SingularQualifiedResource: api.Resource("configmap"),

CreateStrategy: configmap.Strategy, // 创建时的策略
UpdateStrategy: configmap.Strategy, // 更新时的策略
DeleteStrategy: configmap.Strategy, // 删除时的策略

TableConvertor: printerstorage.TableConvertor{TableGenerator: printers.NewTableGenerator().With(printersinternal.AddHandlers)},
}
options := &generic.StoreOptions{
RESTOptions: optsGetter,
AttrFunc: configmap.GetAttrs,
}
if err := store.CompleteWithOptions(options); err != nil {
return nil, err
}
return &REST{store}, nil
}

创建和更新对象时的业务逻辑 - Strategy

pkg/registry/core/configmap/strategy.go

1
2
3
4
5
6
7
8
9
10
11
12
13
14
15
16
17
18
19
20
21
22
23
24
25
26
27
// Strategy is the default logic that applies when creating and updating ConfigMap
// objects via the REST API.
var Strategy = strategy{legacyscheme.Scheme, names.SimpleNameGenerator}

func (strategy) PrepareForCreate(ctx context.Context, obj runtime.Object) {
configMap := obj.(*api.ConfigMap)
dropDisabledFields(configMap, nil)
}

func (strategy) Validate(ctx context.Context, obj runtime.Object) field.ErrorList {
cfg := obj.(*api.ConfigMap)

return validation.ValidateConfigMap(cfg)
}

func (strategy) PrepareForUpdate(ctx context.Context, newObj, oldObj runtime.Object) {
oldConfigMap := oldObj.(*api.ConfigMap)
newConfigMap := newObj.(*api.ConfigMap)
dropDisabledFields(newConfigMap, oldConfigMap)
}

// 对象更新时的校验
func (strategy) ValidateUpdate(ctx context.Context, newObj, oldObj runtime.Object) field.ErrorList {
oldCfg, newCfg := oldObj.(*api.ConfigMap), newObj.(*api.ConfigMap)

return validation.ValidateConfigMapUpdate(newCfg, oldCfg)
}

pkg/apis/core/validation/validation.go

1
2
3
4
5
6
7
8
9
10
11
12
13
14
15
16
17
18
19
20
// ValidateConfigMapUpdate tests if required fields in the ConfigMap are set.
func ValidateConfigMapUpdate(newCfg, oldCfg *core.ConfigMap) field.ErrorList {
allErrs := field.ErrorList{}
allErrs = append(allErrs, ValidateObjectMetaUpdate(&newCfg.ObjectMeta, &oldCfg.ObjectMeta, field.NewPath("metadata"))...)

if oldCfg.Immutable != nil && *oldCfg.Immutable {
if newCfg.Immutable == nil || !*newCfg.Immutable {
allErrs = append(allErrs, field.Forbidden(field.NewPath("immutable"), "field is immutable when `immutable` is set"))
}
if !reflect.DeepEqual(newCfg.Data, oldCfg.Data) {
allErrs = append(allErrs, field.Forbidden(field.NewPath("data"), "field is immutable when `immutable` is set"))
}
if !reflect.DeepEqual(newCfg.BinaryData, oldCfg.BinaryData) {
allErrs = append(allErrs, field.Forbidden(field.NewPath("binaryData"), "field is immutable when `immutable` is set"))
}
}

allErrs = append(allErrs, ValidateConfigMap(newCfg)...)
return allErrs
}

subresource

内嵌在 Kubernetes 对象中,有独立的操作逻辑的属性集合,如 podstatus

例如在 kubectl get pod coredns-857d9ff4c9-fnvm9 -o yaml 时,下面的 status: 内容

1
2
3
4
5
6
7
8
9
10
11
12
13
14
type podStatusStrategy struct {
podStrategy
}

func (podStatusStrategy) PrepareForUpdate(ctx context.Context, obj, old runtime.Object) {
newPod := obj.(*api.Pod)
oldPod := old.(*api.Pod)
newPod.Spec = oldPod.Spec
newPod.DeletionTimestamp = nil

// don't allow the pods/status endpoint to touch owner references since old kubelets corrupt them in a way
// that breaks garbage collection
newPod.OwnerReferences = oldPod.OwnerReferences
}

当更新 Podstatus 时,将所有的 spec 部分丢弃。作用是更新时将 spec 对象和 status 对象分离,更新这部分,则丢弃另外一部分的更新,避免冲突。

注册 APIGroup

pkg/registry/core/rest/storage_core_generic.go

1
2
3
4
5
6
7
configMapStorage, err := configmapstore.NewREST(restOptionsGetter)

storage := map[string]rest.Storage{}

storage[resource] = configMapStorage

apiGroupInfo.VersionedResourcesStorageMap["v1"] = storage

定义 configMapStorage,并且加入到 apiGroupInfo

pkg/controlplane/instance.go

1
2
3
if err := m.GenericAPIServer.InstallAPIGroups(nonLegacy...); err != nil {
return fmt.Errorf("error in registering group versions: %v", err)
}

最终,将对象注册至 APIServer 中,也就是挂载 handler

代码生成

https://github.com/kubernetes/code-generator

deepcopy-gen:为对象生成DeepCopy方法,用于创建对象副本

client-gen:创建Clientset,用于操作对象的CRUD

informer-gen:为对象创建Informer框架,用于监听对象变化

lister-gen:为对象构建Lister框架,用于为GetList操作,构建客户端缓存

coversion-gen:为对象构建Conversion方法,用于内外版本转换以及不同版本号的转换

通过脚本生成代码,例如:hack/update-codegen.sh

References

kubernetes.io kube-apiserver

一文读懂 Kubernetes APIServer 原理

云计算K8s组件系列(一)—- K8s apiserver 详解

Kubernetes指南 kube-apiserver

kubernetes.io 使用 Kubernetes API 访问集群

Kubernetes-API Server

Kubernetes apiserver原理概览

Kubernetes API Server handler 注册过程分析(源码)

从 Kubernetes 中的对象谈起